 tetoblog
実行環境
| Swift | 5.6.1 |
| Xcode | 14.0 |
| macOS | 12.6 |
実装
デモ
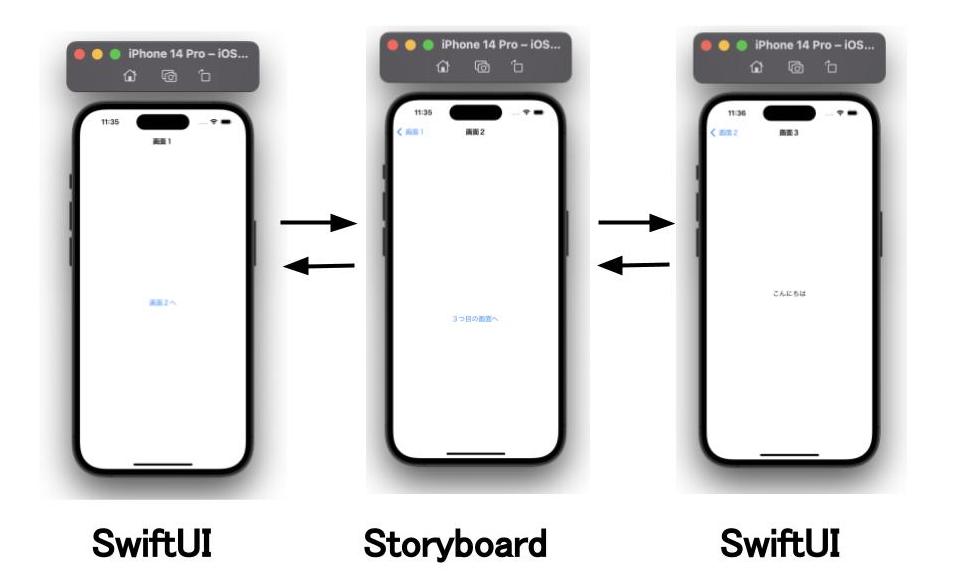
下の動画ように3つの画面構成で、
SwiftUIのコード中にStoryboardを入れ込むミニアプリを作ってみます。
GitHubで全体のソースコードを確認したい方はこちらからどうぞ。
画面構成を図にすれば以下のようになります。
2つ目に遷移する画面のみStoryBoardで実装します。
ファイル作成
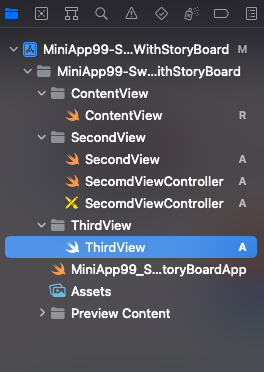
下記のディレクトリ構成で各々のファイルを作成しました。
追加したファイルは以下の4つです。
・SecondView → このコード中でSecondViewControllerを呼び出す
・SecondViewController → このファイルが表示される
・SecondViewController(XIBファイル) → このファイルが表示される
・ThirdView
コーディング
ContentView、SecondView、SecondViewController、ThirdView、
の4つのファイルのコードを以下に記述します。
● ContentView(画面1)
import SwiftUI
import UIKit

struct ContentView: View {
    var body: some View {
        NavigationView {
            NavigationLink(destination: SecondView()){
                Text("画面2へ")
            }
            .navigationBarTitleDisplayMode(.inline)
            .navigationTitle("画面1")
        }
    }
}
このコードは特に特別なことは全くありません。
通常のNavigationViewを利用した画面遷移です。
● SecondView(画面2)
import SwiftUI

struct SecondView: View {
    var body: some View {
        SecondViewControllerWrapper {
            Text("Hello, World!")
        }.navigationTitle("画面2")
    }
}

struct SecondViewControllerWrapper<Content: View>: UIViewControllerRepresentable {

    // 表示するView Controllerのタイプ
    typealias UIViewControllerType = SecomdViewController
    var content: () -> Content

    // ViewControllerのオブジェクトを作成し、初期状態を構成
    func makeUIViewController(context: Context) -> SecomdViewController {
        let viewControllerWithStoryboard = SecomdViewController()
        return viewControllerWithStoryboard
    }

    // ViewControllerの状態をSwiftUIからの新しい情報で更新
    func updateUIViewController(_ uiviewController: SecomdViewController, context: Context) {
    }

}
このコードでは、
UIViewControllerRepresentableに準拠した、
SecondViewControllerWrapperの構造体を宣言しています。
UIViewControllerRepresentableに関して、
参考に公式リファレンスで要点をまとめると、下記の3点が述べられていました。
・ViewControllerを作成、更新、破棄
・UIViewControllerRepresentable インスタンスを使用して、SwiftUI インターフェイスで UIViewController オブジェクトを作成および管理
・作成プロセスと更新プロセスは、SwiftUIViewの動作と並行しており、それらを使用して、アプリの現在の状態情報でViewControllerを構成
参考)
Apple公式ドキュメント(UIViewControllerRepresentable)
Use aUIViewControllerRepresentableinstance to create and manage aUIViewControllerobject in your SwiftUI interface. Adopt this protocol in one of your app’s custom instances, and use its methods to create, update, and tear down your view controller. The creation and update processes parallel the behavior of SwiftUI views, and you use them to configure your view controller with your app’s current state information. Use the teardown process to remove your view controller cleanly from your SwiftUI. For example, you might use the teardown process to notify other objects that the view controller is disappearing.
● SecondViewController(画面2)
import UIKit
import SwiftUI

class SecomdViewController: UIViewController {

    // ボタンが押された際の処理
    @IBAction func didTapNextButton(_ sender: Any) {
        let view = UIHostingController(rootView: ThirdView())
        self.navigationController?.pushViewController(view, animated: true)
    }

}
UIHostingControllerに関して、
参考に公式リファレンスで要点をまとめると、
「UIViewControllerRepresentable インスタンスを使用して、SwiftUI インターフェイスで UIViewController オブジェクトを作成・管理できる」
と述べられていました。
このことから、
UIHostingControllerを利用することで、
次のSwiftUIの画面へ接続させることができることが分かります。
参考)
Apple公式ドキュメント(UIHostingController)
Use a UIViewControllerRepresentable instance to create and manage a UIViewController object in your SwiftUI Create aUIHostingControllerobject when you want to integrate SwiftUI views into a UIKit view hierarchy. At creation time, specify the SwiftUI view you want to use as the root view for this view controller; you can change that view later using therootViewproperty. Use the hosting controller like you would any other view controller, by presenting it or embedding it as a child view controller in your interface.
● ThirdView(画面3)
import SwiftUI

struct ThirdView: View {
    var body: some View {
        Text("こんにちは")
            .navigationTitle("画面3")
    }
}
こちらのコードも特に特別な部分はありません。
まとめ
ということで、本記事はSwiftUIからStoryboardを表示させる方法をまとめました。
GitHubで全体のソースコードを確認したい方はこちらからどうぞ。
アドバイスや改善などあれば本記事の最後のコメント欄からお願いします。
最後まで読んでいただきありがとうございました!
作業効率がグッと上がるPC道具
間違いなしのSwift書籍2冊